Tilted Bows Block Tutorial and My First Giveaway
Giveaway now closed
Good morning all!Welcome to Seraphym Handmade's first Giveaway and free Quilt Block Tutorial. It's a big day for firsts here hey?!
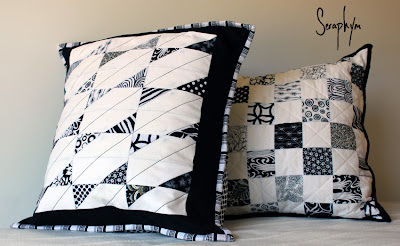
Firstly, the Tutorial. I had a few people ask me how I made the blocks which made up my Monotone Pillows (featured below) so I thought the easiest thing to do would be to write up a tutorial for you guys all to use. I would rate the difficulty of this tutorial to be suited to a confident beginner.
This is my first quilting related tutorial, so I would really love all feedback, the good and the critical.
You can get the tutorial by clicking the link below and downloading the .pdf file.
Tilted Bows Tutorial
Now onto the Giveaway!
In progress, you would have seen yesterday on my WIP post, is four little goodies for only one lucky reader. Today I can tell you they are 4 Mug Rugs :) aren't they cute! This giveaway is open to all readers worldwide, Yay!
The winner will be draw by random number generator, to enter you can do as many of the following as you wish.
1. Comment on this post about what you would make with the Tilted Bows block.
2. follow this blog via RSS or other means, and comment that you have (or already are) and through where.
3. Follow Seraphym Handmade on Pinterest or Instagram (Gatesy88), and comment that you have (or already are) - (links in the side menu >>>)
4. Blog about this Giveaway, Comment with the link.
Entries close Friday 5th April, at 9am Australian Eastern Standard Time.
Giveaway now closed
Good Luck! I can't wait to hear what ideas you have for the block!


Love the colours of the mug rugs. I am a follower of your blog.
ReplyDeleteFollow you on Pinterest. :)
ReplyDeleteI love those mug-rugs-in-progress. Following you!
ReplyDeleteThere is also a giveaway at my blog, if you are interested!
http://www.aquiltisahug.blogspot.com
Hi I love the pillows you have done with your block and that is what I would like to do. I am going on a retreat and it would be a nice time to show them off. Thanks for the tutorial. I will post to you when I have them fnished.
ReplyDeleteI follow on Pininterest and bloglovin.
ReplyDeleteTried your instgram button but it is not working,,,said it was not available with this link. Also love your ironing board cover...have a great day.
ReplyDeleteSorry Sharon, thanks for letting me know :) I've fixed it now so, it's ready to go! (hopefully)
DeleteVery nicely done and clear to understand. Thanks for sharing your tutorial. Looking forward to more ;)!
ReplyDeleteWow, love your pillow and your tutorial is easy to follow and I`d love to make a runner.I arrived through Totally Tutorial and it`s nice to meet you.
ReplyDeleteThis block is so beautiful htat I would make a quilt out of it. Thank you so much for this tutorial.
ReplyDeleteI follow you happily via Bloglovin'
ReplyDeleteI also follow your pinterest page which I love
ReplyDeleteInstagraming.
ReplyDeleteNice tutorial. I might use it for my color exercise for my next quilt design homework assignment. Thanks for sharing it. Just looking over the tutorial/pattern, it would be really great to have some pictures of completed blocks to see what it turns out as. I keep lots of patterns on my computer and forget.
ReplyDelete